To turn on pressure sensitivity in Procreate, simply go to the “Brush” panel and tap “General” settings. Then, adjust the “Opacity” and “Size” sliders to enable pressure sensitivity.
Are you looking to enhance your digital art experience in Procreate by enabling pressure sensitivity? Pressure sensitivity in Procreate can greatly improve your drawing and painting capabilities, allowing for more dynamic and natural-looking brush strokes. By adjusting the “Opacity” and “Size” sliders in the “General” settings of the “Brush” panel, you can easily activate pressure sensitivity and start creating more expressive and detailed artwork.
In this guide, we will walk you through the simple steps to enable pressure sensitivity in Procreate, empowering you to take your digital art to the next level.
Credit: adventureswithart.com
Enabling Pressure Sensitivity In Procreate
Procreate is a powerful digital art application that allows artists to create stunning artwork on their iOS devices. One of the key features that makes Procreate so popular among artists is its pressure sensitivity, which provides a more realistic and natural drawing experience. Enabling pressure sensitivity in Procreate is quick and easy, allowing you to unlock a whole new level of creativity in your artwork.
Accessing The Brush Library
To enable pressure sensitivity in Procreate, you first need to access the Brush Library. This is where you can find and select the brush that you want to adjust the pressure settings for. To access the Brush Library, simply tap on the brush icon located on the top toolbar. This will open the Brush Library panel, where you can choose from a wide variety of brushes.
Adjusting Brush Settings For Pressure Sensitivity
Once you have selected a brush from the Brush Library, you need to adjust the brush settings to enable pressure sensitivity. To do this, tap on the brush settings icon located at the top right corner of the Brush Library panel. This will open the Brush Studio, where you can customize various aspects of the selected brush.
Within the Brush Studio, you will find a range of settings that you can adjust. Look for the “General” tab, and within it, there will be an option for “Opacity.” Tap on the “Opacity” option to reveal the pressure curve settings.
The pressure curve allows you to control how the brush responds to the pressure applied by your stylus or finger. By default, the pressure curve is set to a linear response, but you can customize it according to your preference.
To enable pressure sensitivity, make sure the “Pressure” option is selected. This will ensure that the brush opacity varies based on the pressure applied. You can also adjust the pressure curve by tapping and dragging the control points, allowing you to fine-tune the brush opacity response.
Once you have adjusted the pressure curve to your liking, simply tap on the “Done” button at the top right corner of the Brush Studio to save your changes. You can now start using the brush with pressure sensitivity enabled, enhancing the realism and depth of your artwork.
Calibrating Pressure Sensitivity
Start of HTML responseCalibrating pressure sensitivity in Procreate is vital for achieving precise and natural-looking brushstrokes. Properly setting up pressure sensitivity levels will ensure a more fluid and responsive digital drawing experience. In this guide, we will walk you through the process of testing and fine-tuning pressure settings in Procreate.
Testing Pressure Sensitivity Levels
To begin calibrating pressure sensitivity in Procreate, start by testing the current pressure levels of your stylus or Apple Pencil. Open Procreate and create a new canvas. Select a brush from the brush library and begin drawing lightly on the canvas. Gradually increase the pressure of your strokes to observe how the brush responds to the varying pressure levels. Note any inconsistencies in the pressure sensitivity, such as gaps in the strokes or uneven line thickness.
Fine-tuning Pressure Settings
After testing the pressure sensitivity, proceed to fine-tune the pressure settings in Procreate. Access the brush settings panel and locate the “Pressure” or “Opacity” settings. Adjust the sensitivity curve to refine the brush’s response to pressure. Experiment with different curve shapes and values to achieve a pressure sensitivity that feels comfortable and natural to your drawing style. Once satisfied, save the modified pressure settings as a custom brush for future use.
Advanced Tips For Pressure Sensitivity
When it comes to digital art, mastering pressure sensitivity can take your work to the next level. Understanding advanced tips for pressure sensitivity in Procreate can help you achieve more nuanced and professional-looking artwork. Let’s explore how you can make the most of pressure sensitivity in Procreate with these advanced techniques.
Utilizing Pressure For Different Effects
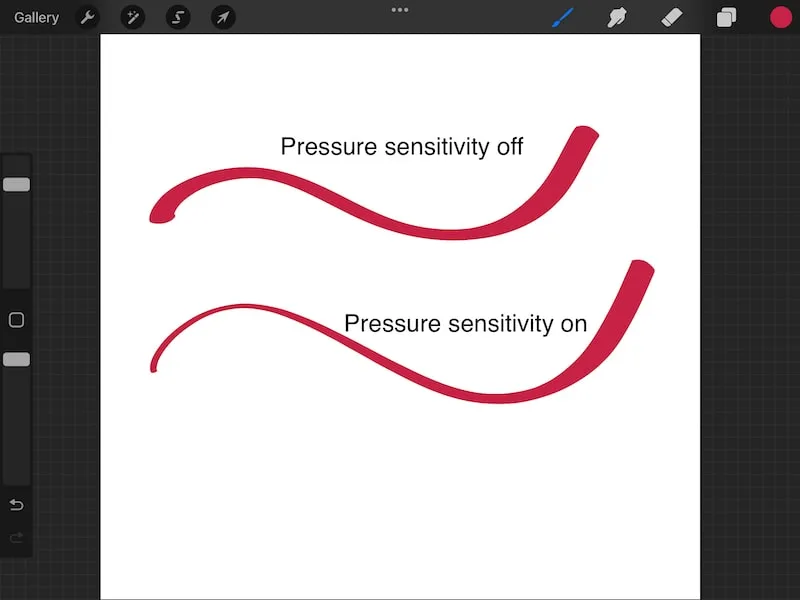
Pressure sensitivity in Procreate allows you to control the thickness and opacity of the brush strokes, enabling you to create varying effects in your artwork. By pressing lightly on your stylus, you can produce delicate, wispy lines, while applying more pressure results in bolder, broader strokes. Take advantage of this feature to add depth and dimension to your digital creations.
Experimenting With Pressure Curve Adjustments
Procreate offers the ability to customize the pressure curve, allowing you to fine-tune the sensitivity of your stylus. By accessing the “Preferences” menu in Procreate, you can adjust the pressure curve to cater to your specific drawing style. Experiment with different curve profiles to find the perfect balance of pressure and response, empowering you to achieve precise and controlled brushwork.
Credit: folio.procreate.com
Troubleshooting Pressure Sensitivity Issues
Pressure sensitivity is an essential feature when using Procreate as it allows for smooth and precise strokes in your artwork. However, there may be instances where you encounter issues with pressure sensitivity. This section will guide you through common problems and solutions you can try on your own and when it’s appropriate to contact Procreate support.
Common Problems And Solutions
If you’re experiencing pressure sensitivity issues in Procreate, here are some common problems you might be facing along with their solutions:
- Inconsistent Pressure Sensitivity: If the pressure sensitivity is not consistent while you’re drawing, try recalibrating your stylus. Check whether the issue persists with other art applications as well.
- No Pressure Sensitivity: In case your stylus isn’t recognized by Procreate or pressure sensitivity is completely absent, make sure the firmware of your stylus is up to date. Additionally, check if the app is updated to the latest version.
- Unsupported Stylus: Not all styluses are compatible with Procreate’s pressure sensitivity feature. Ensure that your stylus is on the list of supported devices.
- Brush-Specific Problems: If the pressure sensitivity is working fine with some brushes but not others, it’s likely a brush-specific issue. Adjust the brush settings to enable pressure sensitivity or try using a different brush.
Contacting Procreate Support
If you’ve tried the suggested solutions and are still encountering pressure sensitivity issues, it may be time to reach out to Procreate support. They have a dedicated team of professionals who can provide personalized assistance and help resolve any technical difficulties you’re facing with the app. Be sure to detail the problem, steps you’ve taken, and any relevant information about your device and stylus when contacting them.

Credit: designbundles.net
Frequently Asked Questions On How To Turn On Pressure Sensitivity In Procreate
How Do I Turn On Pressure Sensitivity On My Ipad?
To activate pressure sensitivity on your iPad, go to Settings, select Apple Pencil, then toggle on the option for Pressure Sensitivity.
Does Procreate Have Pressure Sensitivity Without Apple Pencil?
Yes, Procreate requires pressure-sensitive styluses like Apple Pencil for pressure sensitivity to function effectively.
Why Doesnt My Apple Pencil Have Pressure Sensitivity?
The Apple Pencil lacks pressure sensitivity because it is an older model. Some newer versions, like the Apple Pencil 2, do have pressure sensitivity for more precise and responsive input. Consider upgrading to a newer model if you require pressure sensitivity.
Why Is My Apple Pencil Pressure Procreate Not Working?
The Apple Pencil pressure issue in Procreate may be due to a faulty pencil or software glitch. Make sure the pencil is paired and charged, check for software updates, and recalibrate the pressure settings. If the problem persists, contact Apple Support for further assistance.
Conclusion
To sum up, activating pressure sensitivity in Procreate is essential for enhancing your digital artwork and creating realistic brush strokes. By following the simple steps mentioned in this blog post, you can easily enable this feature and unlock a whole new level of creativity.
So, don’t hesitate to experiment with different pressure settings and brush styles to bring your artistic visions to life. Elevate your Procreate experience with pressure sensitivity, and let your imagination soar. Happy creating!