To jump a 24-volt system, connect the positive terminals first, followed by the negative terminals. Properly connecting the cables ensures a safe and effective jump start for your 24-volt system.
When dealing with a 24-volt system, it is crucial to follow the correct procedures to avoid any damage or hazards. Jump-starting a 24-volt system requires attention to detail and adherence to safety measures. By understanding the steps involved and taking the necessary precautions, you can successfully jump start your 24-volt system with confidence.
It is important to have the right tools on hand and to approach the process methodically to avoid any potential mishaps. Keep reading to learn more about how to safely and effectively jump your 24-volt system.
Understanding 24 Volt System
Jump starting a 24-volt system requires connecting two 12-volt batteries in series. Ensure the batteries have the same capacity and connect the positive terminal of the good battery to the dead battery’s positive terminal. Then, connect the negative terminal of the good battery to the engine block or ground of the vehicle with the dead battery.
In an 24 Volt System, two 12-volt batteries are connected in series. It is crucial to grasp the key aspects of this system to ensure proper functionality.
Difference From 12 Volt System
24 Volt System has twice the voltage power than a 12-volt system, allowing for increased performance and efficiency.
Components Of 24 Volt System
- Batteries: Two 12-volt batteries connected in series to form a 24-volt power source.
- Wiring: Heavy-duty wiring capable of handling higher voltage levels.
- Devices: Components designed to operate at 24 volts for optimal functionality.
Credit: www.randakksblog.com
Importance Of Jumping A 24 Volt System
Jumping a 24-volt system is crucial to ensure the smooth functioning of your equipment and avoid disruptions in operations.
Ensuring Continuity Of Operations
Ensuring continuity of operations through proper jumping of a 24-volt system is essential to maintain productivity.
Emergency Situations
During emergencies, jumping a 24-volt system can be a lifesaver, allowing you to quickly restore power and functionality.
Preparing To Jump Start
Gathering Necessary Tools
The first step in preparing to jump start a 24-volt system is to gather the necessary tools. Here is a list of the items you will need:
- Jumper cables: Ensure they are suitable for 24-volt systems.
- Voltmeter: To check the voltage levels.
- Insulated gloves: For safety while handling the electrical components.
- Safety goggles: Protect your eyes during the jump start process.
- Manual or guide: Refer to the specific vehicle’s manual for any model-specific instructions.
Ensuring Safety Precautions
Prioritize safety when preparing to jump start a 24-volt system. Follow these essential safety precautions:
- Turn off the ignition: Ensure all electrical components are switched off.
- Identify the positive and negative terminals: Familiarize yourself with the battery terminals; the positive terminal is usually red, and the negative terminal is black.
- Wear insulated gloves and safety goggles: Protect yourself from potential electrical sparks and corrosive materials.
- Position the vehicles correctly: Park the vehicle with the dead battery close enough for the jumper cables to reach but not touching each other, ensuring both are in park or neutral with the parking brake engaged.
- Check for any signs of damage: Inspect the battery for cracks, leaks, or other visible damage.
Credit: www.pinterest.com
Steps To Jump Start A 24 Volt System
Jump starting a 24 volt system doesn’t have to be complicated. With a few simple steps, you can get your vehicle up and running again in no time. In this guide, we will walk you through the process, ensuring your safety and a successful jump start.
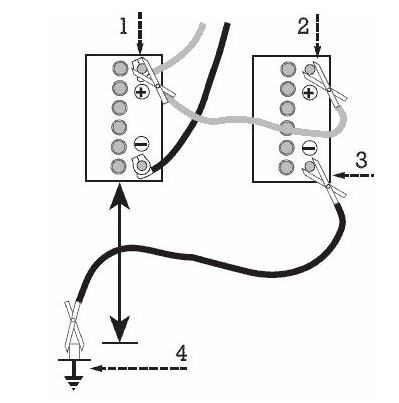
Connecting The Positive Terminals
To begin the jump start process, you’ll need to connect the positive terminals of the dead and live batteries. Here’s how you can do it:
- Locate the positive terminals on both batteries.
- Ensure both vehicles are turned off and the keys are removed from the ignition.
- Take the positive jumper cable (usually red in color) and attach one end to the positive terminal of the dead battery.
- Connect the other end of the positive jumper cable to the positive terminal of the live battery.
Connecting The Negative Terminals
After connecting the positive terminals, it’s time to move on to the negative terminals. Follow these steps:
- Locate the negative terminals on both batteries.
- Take the negative jumper cable (usually black in color) and attach one end to the negative terminal of the live battery.
- Before connecting the other end of the negative jumper cable, find a bare metal surface on the engine block of the vehicle with the dead battery.
- Securely connect the other end of the negative jumper cable to the engine block, making sure it is away from the battery and any moving parts.
Important Note: Make sure the jumper cables are not tangled or touching any moving parts of the engine.
Now that the cables are properly connected, it’s time to start the engine of the vehicle with the live battery. Allow it to run for a few minutes to charge the dead battery.
Once the dead battery has gained some charge, you can try starting the vehicle with the dead battery. If it starts successfully, carefully disconnect the jumper cables in reverse order, beginning with the negative cables and ending with the positive cables.
Remember: If the vehicle still doesn’t start after a few attempts, it may be best to seek professional assistance to avoid causing further damage to your vehicle’s electrical system.
Post-jump Start Considerations
Once you have successfully jump-started your 24-volt system, there are a few important considerations to keep in mind to ensure that the system remains in good condition and to prevent any future incidents. In this section, we will discuss two crucial aspects: checking for system integrity and preventing future incidents.
Checking For System Integrity
After jump-starting your 24-volt system, it is essential to verify its integrity to avoid any potential issues. Here’s a simple checklist to help you ensure everything is in optimal condition:
- Inspect the battery terminals for any signs of corrosion or looseness. Clean and tighten them if necessary to maintain a secure connection.
- Examine the battery cables and wires for any visible wear or damage. Replace any frayed or worn-out parts to prevent potential electrical hazards.
- Check the battery voltage using a multimeter to ensure it is within the normal range. Refer to the manufacturer’s specifications for the appropriate voltage values.
- Inspect the fuses and circuit breakers related to the 24-volt system. Replace any blown fuses or reset tripped circuit breakers to maintain proper electrical functioning.
Preventing Future Incidents
To prevent future incidents and ensure the longevity of your 24-volt system, here are some preventive measures you can take:
- Regularly maintain and clean the battery terminals to prevent corrosion buildup, which can impede the battery’s performance.
- Perform routine inspections of the battery cables and wires for any signs of wear or damage. Promptly replace any compromised parts to avoid potential electrical issues.
- Consider investing in a battery maintainer or charger that is compatible with your 24-volt system. This will help keep your batteries charged and in good condition when not in use.
- When parking your vehicle for an extended period, disconnect the battery to prevent any parasitic drain on the system.
- Ensure that all electrical components in your vehicle, such as headlights and accessories, are in good working condition, as faulty components can create strain on the 24-volt system.
By following these post-jump start considerations, you can maintain the integrity of your 24-volt system and reduce the likelihood of future incidents. Take the time to regularly inspect and maintain your system to ensure optimal performance and reliability.

Credit: www.redarcelectronics.com
Frequently Asked Questions On How To Jump 24 Volt System
How Do You Jumpstart 24 Volts?
To jumpstart 24 volts, connect the positive cable to the battery’s positive terminal and the negative cable to its negative terminal. Start the functioning vehicle and leave it running for a few minutes before trying to start the 24-volt vehicle.
Can You Boost A 24v System With A 12v?
Boosting a 24V system with a 12V is not recommended as it can cause damage. It’s crucial to match voltage levels for safe operation.
How To Jump Start 24v With 2 12v?
To jump start a 24V with 2 12V, connect the batteries in series for a combined 24V output. Using jumper cables, attach the positive cable to the positive terminal of the working battery, and then to the positive terminal of the dead battery.
Repeat this process with the negative cables, then start the vehicle.
How Do You Charge A 24 Volt System With A 12 Volt Charger?
To charge a 24 volt system with a 12 volt charger, you will need to use a step-up converter or transformer. This device increases the voltage output from 12 volts to 24 volts, allowing it to properly charge the 24 volt system.
Be sure to select the appropriate converter for your specific setup.
Conclusion
Jumping a 24-volt system can be tricky, but with the right precautions and steps, you can do it safely. It’s important to understand the system, follow the proper procedure, and prioritize safety. By following these tips, you can effectively jump-start a 24-volt system without causing damage to your vehicle.