To finish an 80 lower, follow the specific instructions provided with the lower receiver kit. Completing an 80 lower involves milling out the remaining material to build a firearm.
Before you begin the process, ensure you have all the necessary tools and equipment. Understanding the steps involved in milling the lower will help you successfully finish the project. Take your time to carefully follow each step for a safe and effective completion.
Adhering to safety guidelines and legal regulations is crucial when finishing an 80 lower. Once you have completed the milling process, assemble the remaining firearm components according to the manufacturer’s instructions. With attention to detail and precision, you can successfully finish an 80 lower and have a functioning firearm ready for use.
Credit: www.pewpewtactical.com
Gathering The Necessary Tools And Materials
When it comes to finishing an 80 lower receiver, having the right tools and materials is crucial. In this section, we’ll discuss the key elements for efficiently completing this process. From selecting the right lower receiver to picking the correct tools and jig, let’s dive into what you need to gather before you get started.
Selecting The Right Lower Receiver
Choosing the right lower receiver is the foundation of any successful 80 lower build. These receivers are the main component that houses the trigger group, magazine well, and other vital parts of your firearm. It’s important to ensure that the lower receiver you choose matches the specific caliber and configuration you desire. Make sure to verify any legal requirements and restrictions that may apply in your area as well.
Selecting The Correct Tools
Equipping yourself with the necessary tools is the next step in your 80 lower receiver build. To successfully complete this project, you’ll need a few essential tools, including but not limited to:
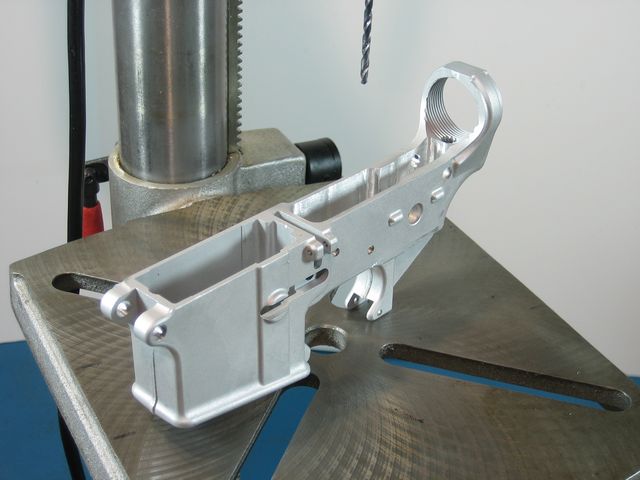
- A drill press or milling machine: This tool will be used to remove material from the receiver, creating the necessary cavities for the trigger group and other components.
- A vise: A sturdy vise is essential for securely holding the lower receiver while you work on it. It will provide the stability you need to ensure precise cuts and drilling.
- Drill bits: You’ll need a set of high-quality drill bits designed for metal to effectively remove material and create the necessary holes in the receiver.
- Calipers: These measuring tools will help you ensure accurate dimensions and maintain the proper tolerances throughout the build process.
- Safety equipment: Always prioritize your safety by wearing protective gear such as safety goggles, gloves, and a dust mask.
Selecting The Right Jig And Components
Along with the lower receiver and tools, you’ll also need a jig and components for your build. The jig is a crucial tool that guides you through the milling or drilling processes, ensuring precise and accurate cuts. It’s important to select a jig that is compatible with the specific lower receiver you’ve chosen.
Additionally, you’ll need the necessary components to complete your build. This includes the trigger group, buffer tube assembly, pistol grip, and other parts specific to your desired firearm configuration.
By gathering all the necessary tools, selecting the right lower receiver, and ensuring compatibility with the jig and components, you’ll be well-prepared to finish your 80 lower receiver build. Now that you know what you need, it’s time to move on to the next steps of the process.
Credit: www.80-lower.com
Preparing The Workspace
Welcome to the essential guide on how to finish an 80 lower. A crucial step in completing this project is preparing your workspace. Follow our tips below to set up a productive and safe environment for your build.
Setting Up A Well-lit And Well-ventilated Area
- Choose a well-lit space with good natural or artificial lighting.
- Ensure proper ventilation to keep the area free of fumes.
- Consider using a fan or opening windows for air circulation.
Organizing Tools And Components
- Gather all necessary tools and components for the project.
- Organize everything in a tidy manner for easy access.
- Label parts and tools to avoid confusion during assembly.
Understanding The Lower Receiver
Exploring The Parts Of The Lower Receiver
A lower receiver is a crucial component of a firearm that houses the trigger mechanism and other essential parts.
A lower receiver consists of the following key components:
- Trigger Guard
- Magazine Well
- Buffer Tube
- Selector Switch
Understanding The Legalities And Regulations
When it comes to finishing an 80% lower receiver, it’s important to be aware of the legalities and regulations surrounding firearms.
Here are some essential things to consider when finishing an 80% lower receiver:
- Ensure compliance with federal and state laws
- Serializing the finished lower if required
- Only build firearms for personal use
Step-by-step Lower Receiver Completion
Completing an 80 lower receiver, also known as an 80% lower, is a rewarding and satisfying project for firearm enthusiasts. With the right tools and knowledge, you can transform an unfinished lower receiver into a fully functional firearm. In this guide, we will walk you through the step-by-step process of finishing an 80 lower receiver, ensuring accuracy and compliance with local laws.
Inserting The Jig And Receiver
Before you start cutting and drilling, it is important to secure the 80 lower receiver in a jig, which is a specialized tool designed to hold the receiver in place during the completion process. The jig will provide stability and ensure precise measurements. Follow these steps to insert the jig and receiver:
- Place the 80 lower receiver into the corresponding space in the jig. Ensure it fits snugly and aligns properly with the jig’s markings.
- Tighten the screws on the jig to secure the receiver in place. Make sure the receiver is firmly held to prevent any movement during the cutting and drilling process.
Cutting And Drilling
Now that the receiver is securely in place, it’s time to cut and drill the necessary holes to complete the lower receiver. Here’s a step-by-step breakdown of the cutting and drilling process:
- Identify the areas on the receiver that require cutting or drilling based on the instructions provided with your specific lower receiver kit.
- Use a drill press or a handheld drill to cut and drill the marked areas according to the measurements provided.
- Pay close attention to depth and alignment to ensure the holes are accurately formed.
- Take regular breaks to clean the cutting debris and ensure the workspace remains organized and safe.
Assembling The Lower Receiver
Once the cutting and drilling process is complete, it’s time to assemble the lower receiver. Follow these steps to ensure a proper assembly:
- Begin by attaching the trigger assembly, following the manufacturer’s instructions carefully.
- Ensure all pins, springs, and components are properly aligned and securely in place.
- Test the functionality of the trigger assembly by performing dry fire tests.
- If everything functions as intended, proceed to attach the grip, buffer tube, and stock.
Congratulations! You have successfully completed the step-by-step lower receiver completion process. Finish your build by attaching the upper receiver and any other accessories to create a fully functional firearm. Remember to adhere to all local laws and regulations regarding firearm ownership and assembly.
Finishing And Testing
Finishing and testing your 80 lower is a crucial step in the process of building a firearm. This stage ensures that the lower is properly prepared for use and is safe to operate. In this section, we will cover the important steps of sanding and polishing, as well as the necessary safety checks and test firing procedures.
Sanding And Polishing
First, begin by carefully sanding the 80 lower to remove any rough edges or uneven surfaces. Use a fine-grit sandpaper to smooth out the rough areas, taking care to maintain a consistent surface. Once it is sanded, move on to polishing. Apply a metal polish to enhance the surface finish of the lower. This will give it a clean and professional appearance while also protecting it from corrosion.
Safety Checks And Test Firing
Prior to assembly, perform a series of safety checks to ensure the lower is free from defects and safe to use. Inspect the lower for any signs of damage or imperfections. Check all component fitments, ensuring there is no excessive play or looseness. Once assembled, conduct a test firing to ensure proper functionality and accuracy. It’s crucial to test fire in a controlled and safe environment, following all necessary safety precautions.
Credit: www.gunbuilders.com
Frequently Asked Questions For How To Finish An 80 Lower
Can You Finish An 80 Lower With A Drill Press?
Yes, an 80 lower can be finished using a drill press. It is a popular and effective method for completing the lower receiver. The key is to follow the appropriate instructions and safety measures to ensure a successful outcome.
Can Someone Else Mill My 80% Lower?
Yes, someone else can mill your 80% lower.
What Is The Benefit Of An 80% Lower?
An 80% lower offers greater customization and privacy for building a firearm from scratch.
Can You Do A 80 Lower With A Hand Drill?
Yes, you can complete an 80% lower receiver using a hand drill. It requires precision and patience.
Conclusion
Finishing an 80 lower can be an exciting project for gun enthusiasts. By following the steps mentioned in this blog post, you can successfully complete the process and have a functional firearm. Remember to prioritize safety, use the right tools, and adhere to legal requirements.
Enjoy the sense of accomplishment and satisfaction that comes with DIY gunsmithing. Happy building!